Boot your system with Logpoint Director ISO v1.0.0.
Select Fabric Server and click OK.
Fabric Server must be installed before installing API server. The hardware used to configure the cluster mode must be identical to ensure efficiency.
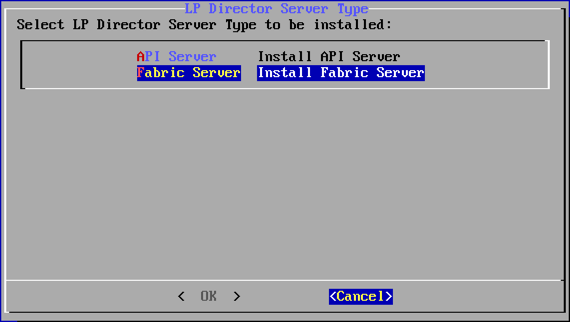
Selecting LP Director Server Type
The installer detects the number of hard disk drives (HDD) present in the system and provides various options for Director installation accordingly. If you use more than one HDD, it increases the fault tolerance of the system. The available types of Director installation according to the number of HDDs are:
Number of HDD(s) |
Mode of Installation |
|---|---|
1 |
Single |
2 |
Mirror/ Single |
3 or more |
RAIDZ/ Mirror/ Single |
Note
The ZFS (Zettabyte File System), used in the Logpoint Director, itself provides a software-defined solution for disk-based redundancy (Mirror, RAIDZ). Hence, it is not recommended to use hardware-based RAID. Doing so limits the ZFS to perform self-healing on checksum failures.
When selecting the RAIDZ mode, the first three disks is used for OS and application installation. The remaining disks, if any, can be used to extend the disk space or used as L2ARC (Level 2 Adjustable Replacement Cache) or ZIL (ZFS Intent Log) for enhancing the read/write performance of ZFS. It can be done using the ZFS commands.

For One HDD

For Two HDDs

For Three HDDs
Select a mode of installation and click Continue.
Click Back to revisit the LP Director Server Type window or click Continue to proceed.
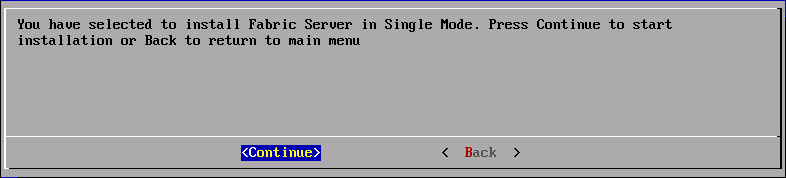
Single Mode Selected
The first reboot of the installer occurs and the installation process starts. The installation may take some time.
Multiple warning messages may appear during the first boot of the installation process. These errors are related to setting up a Live DVD environment and can be ignored. These messages do not cause any issue during the installation.
Once the installation is complete, a message appears in the console. Press Enter and wait for the installer to list all the available Ethernet interfaces.
The installer detects and lists all the Ethernet interfaces connected to the system. Choose the required network interface to modify its configuration and click OK.
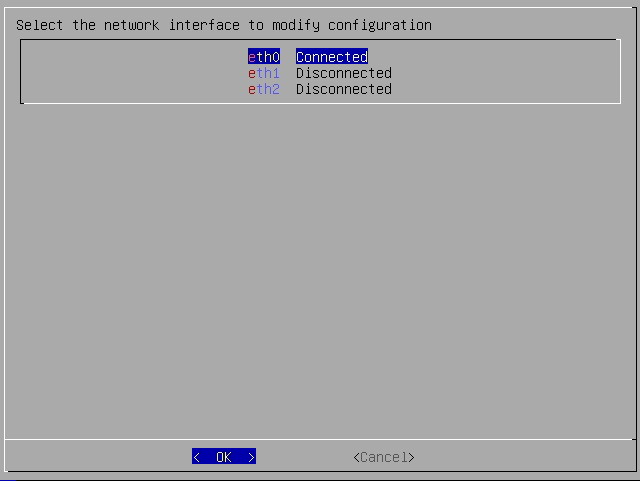
Select the Network Interface
The installer extracts the configuration of selected Ethernet interface of the Fabric Server. Revise the configurations if necessary and click Submit.
The full configuration details of the selected Ethernet interface is displayed if DHCP is enabled. If DHCP is not enabled, then only the fields “Hostname” and “DOMAIN” appear and you need to manually enter the “IP”, “Netmask”, and “Gateway” fields.
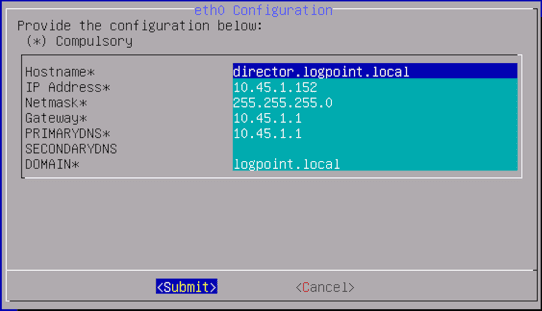
Enter the Network Configuration
Click Back to revisit the configurations or click Continue to proceed.
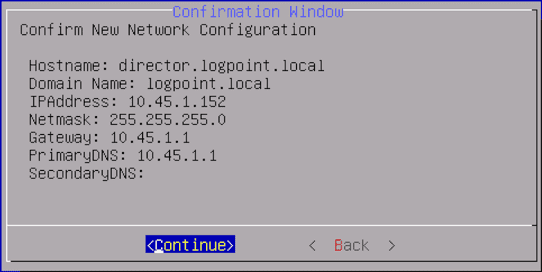
Confirming the New Network Configuration
The Fabric Server Installation Type window appears. There are two modes of Fabric Server installation, the Standalone and the Cluster.
Standalone mode requires the installation of a single Fabric Server.
To configure Fabric Server in the standalone mode:
Select Standalone and click OK.

Selecting Fabric Server Installation Type
Enter the tunnel IP for Fabric Network connection and click OK. The tunnel IP is the internal IP address through which the Logpoint Director components communicate with each other.
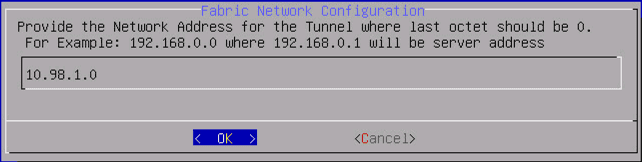
Adding Network Address
Enter the IP address of Remote Syslog Server where the Audit Logs of the Fabric Server must be forwarded and click OK.
If the Remote Syslog Server is not ready, you can leave the default settings as they are. You can later execute the change-rsyslogip command to change the IP address of the Remote Syslog Server, once the installation process is completed.
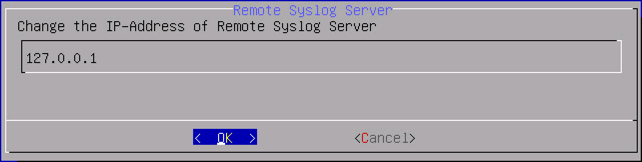
Changing IP Address of Remote Syslog Server
After the installation of the standalone Fabric Server, a dialog box appears to configure the API server.
Enter the fully qualified hostname of the API Server and its static IP address and click Submit.
The IP range 10.98.1.2 - 10.98.1.9 is used by API Server and LPSM for administrative purposes. If you cancel this step in the installation process, you can later use the addfwrule command to set the Static Tunnel IP Address for the API Server.
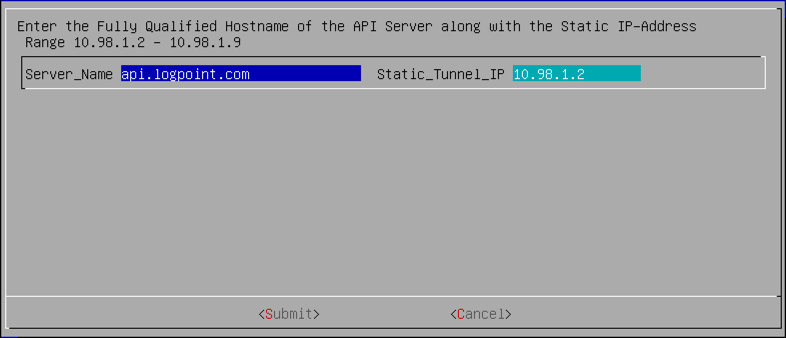
Adding API Server Name and its Static Tunnel IP
Click Back to revisit the configurations or click Continue to proceed.

Firewall Confirmation
The system reboots to support new configurations and the Fabric login window appears.

Fabric Login Page
Log in using the following credentials:
username: cmdr-admin
password: changeme
It is recommended that the password is changed immediately using the passwd command.
Execute the fabric-app-installer command and click OK. You are reminded to configure the NTP server after installing the Fabric applications.
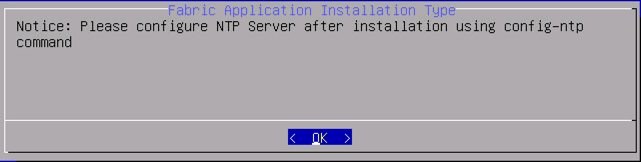
Confirming NTP Server Configuration
Execute the config-ntp command to configure and manage the NTP server.
Warning
It is mandatory to synchronize the time between all the Director components (Fabric-enabled Logpoint, Logpoint Search Master, Fabric Server(s) and API Server).
The Fabric application installation continues on the Standalone Fabric Server. Click OK.
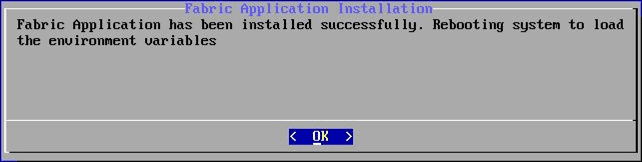
Successful Fabric Application Installation
The system reboots to continue with the Fabric application installation.
Note
You must repeat the entire installation cycle if you install a new Fabric Server.
It is recommended to store the transactional logs of the Fabric Proxy on a dedicated hard disk. It makes the system faster and more efficient in terms of memory, thus improving the throughput. Refer to the Storing Transactional Logs of Fabric Proxy on a Different Disk section for details.
Cluster mode creates a group of servers that work together to maintain high availability of applications and services. If one Fabric Server fails, another server in the cluster can take over its workload. The number of servers required to overcome n number of server failure is 2n+1. That means, to overcome two server failures you need to install five servers in the cluster.
Note
The Director setup currently handles upto three server failures.
To configure Fabric Server in the cluster mode:
Select Cluster in the Fabric Server Installation Type window and click OK.

Selecting Fabric Server Installation Type
Enter the number of cluster nodes to be used in the Fabric Server and click OK.

Entering Number of Cluster Nodes
Enter the Fabric Proxy Node ID for the configuration of the Fabric Server and click OK. The Fabric Proxy Node ID must be different for each node.
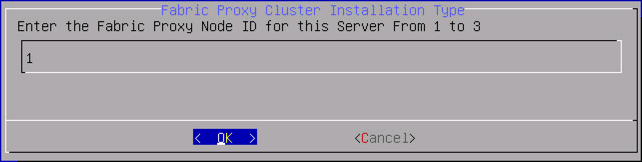
Entering Fabric Proxy ID
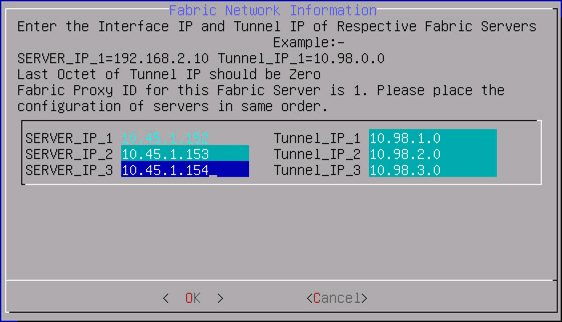
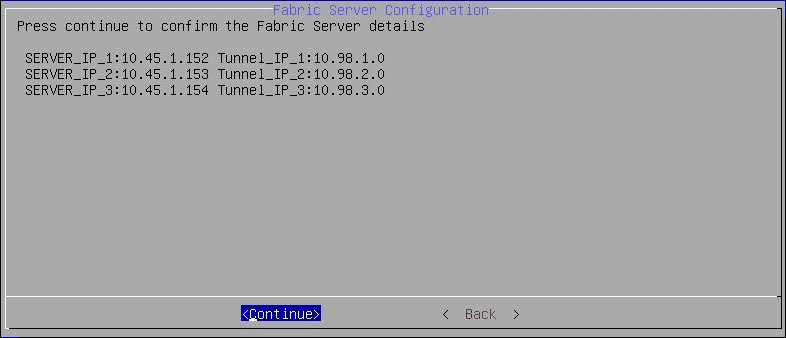
Enter the IP addresses of the interface and their respective tunnels and click OK.
For each node of the Fabric Cluster, a private tunnel is provided for a secure communication.
The tunnel IP is the internal IP address through which the Logpoint Director components communicate with each other.
The number of interfaces is determined by the number of cluster nodes.
The IPs of the Fabric Server must be entered sequentially.
Entering Interface IP and their Tunnel IP
Click Back to revisit the configurations or Click Continue to proceed.
Confirming Fabric Server Configuration
A confirmation window pops up after the installation process completes. Click OK.
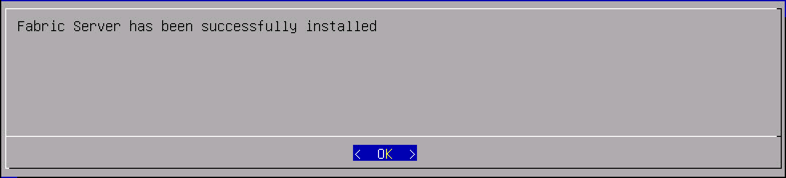
Successful Fabric Server Installation
Enter the IP address of Remote Syslog Server to which the Audit Logs must be forwarded and click OK.
If the Remote Syslog Server is not ready, you can leave the default settings as they are. You can later execute the change-rsyslogip command to change the IP address of the Remote Syslog Server, once the installation process completes.
Changing IP Address of Remote Syslog Server
After the installation of the Fabric Server, a dialog box appears to configure the API server. Enter the Fully Qualified Domain Name (Hostname) of the API Server and its static IP address.
The IP range 10.98.1.2 - 10.98.1.9 is used by API Server and LPSM for administrative purposes. If you cancel this step in the installation process, you can later use the addfwrule command to set the Static Tunnel IP Address for the API Server.

Entering the API Server Name and its Static IP Address
Click Submit.
Firewall Configuration
Click Back to revisit the configurations or click Continue.
The system reboots to support the new configurations, and the Director login window appears.
Fabric Login Page
Log in using the following credentials:
username: cmdr-admin
password: changeme
It is recommended to change the password immediately using the passwd command.
Enter the fabric-app-installer command and click OK. You are reminded to configure NTP server after installing the Fabric applications.
Configure NTP Server Notice
Execute the config-ntp command to configure and manage the NTP server.
Warning
It is mandatory to synchronize the time between all the Director components (Fabric-enabled Logpoint, Logpoint Search Master, Fabric Server(s) and API Server).
If the Fabric Proxy Node ID of the Fabric Server is 1, it is automatically configured as the Master Fabric Authenticator Server. If the Fabric Proxy Node ID of the Fabric Server is other than 1, then it is configured as the Fabric Authenticator Slave Server.
14.1 For the Master Fabric Authenticator Server (when the Fabric Proxy Node ID is equal to 1), you should provide the Fully Qualified Domain Name (FQDN) of all Fabric Authenticator Slave Servers and click OK.
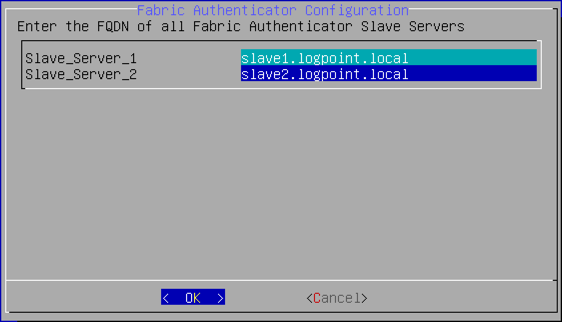
Entering Fully Qualified Domain Name
14.1.1. Click Back to revisit the Fabric Authenticator configuration or click Continue to confirm the configuration.
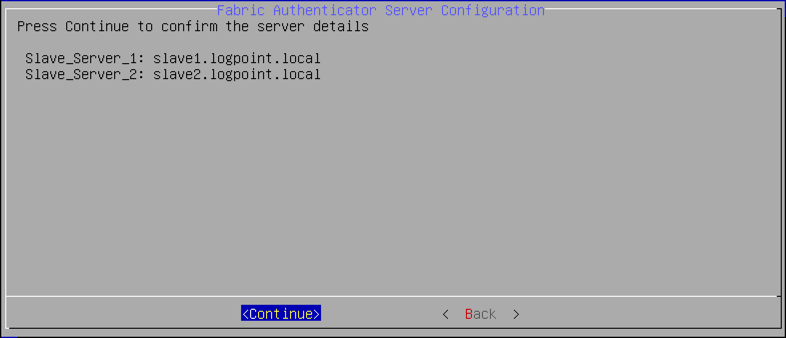
Fabric Authenticator Server Configuration Confirmation
14.1.2. Enter the tunnel IP address of the respective Fabric Authenticator Slave Servers and click OK.
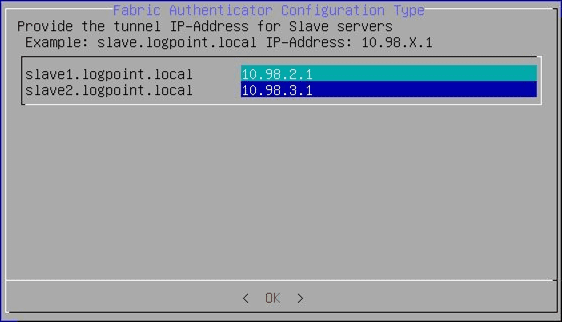
Enter Tunnel IP Address for Slave Servers
14.1.3. Click Continue to confirm the configurations.
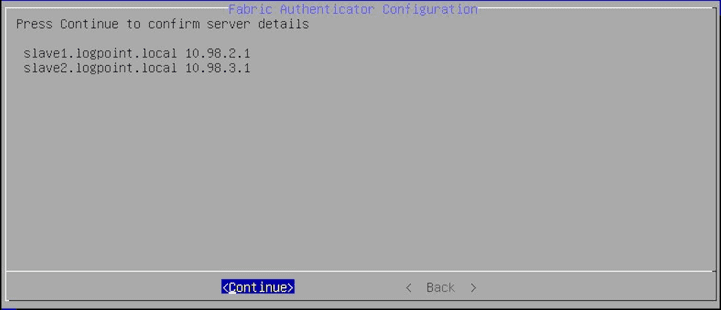
Confirming Server Details
The system reboots after the successful installation of the Fabric application.
14.2. For the Fabric Authenticator Slave Server (when the Fabric Proxy Node ID is other than 1), you must provide the IP address of the Master Fabric Authenticator Server and click OK.
After successfully installing the Fabric application on all the Fabric Servers, execute start-fabric-app command in Master Fabric Authenticator Server Node 1 to initialize the Fabric application.
Note
Repeat the installation process for the Fabric Server for every node of the cluster. For example, if a Fabric Server has 3 nodes you will install the Fabric Server 3 times. Once on each node.
Assign the same Domain Name for each node of the Fabric Server.
Repeat the entire installation when you install a new Fabric Server.
Store transactional logs of the Fabric Proxy on a dedicated hard disk. This increases system performance and efficiency and improves throughput. Go to the Storing Transactional Logs of Fabric Proxy on a Different Disk for details.
You must deploy the Fabric Server AMI/OVA/VHD before installing the Fabric Server. To learn how, go to the Deploying the Director AMIs, the Deploying the Director OVAs and Deploying the Director Azure VHDs.
Access the Fabric Server. The installer detects and lists all the ethernet interfaces connected to the system. Select the appropriate network interface to modify its configuration and click OK.
Select the Network Interface
Enter the IP Address, Netmask, and Gateway. The installer extracts the remaining configuration of selected ethernet interface of the Fabric Server. You can change the configurations if you need to.
Warning
For Fabric Server AMI: Do not change the IP Address, Netmask, and Gateway. AWS environment does not allow these changes after launching the instances.
Network Interface Configuration
Click Submit.
Confirmation Window
Click Continue. You can click Back to revisit the configurations.
The Fabric Server Installation Type window appears. There are two modes of Fabric Server installation, the Standalone and the Cluster.
Standalone mode requires the installation of a single Fabric Server instance.
To configure Fabric Server in the standalone mode:
Select Standalone and click OK.
Selecting Fabric Server Installation Type
Enter the tunnel IP for the Fabric network connection and click OK. The tunnel IP is the internal IP address through which the Logpoint Director components communicate with each other.
The Fabric Server reboots to support new configurations.
Adding Network Address
Enter the Fabric Server’s default credentials:
username: cmdr-admin
password: changeme
We recommend you to change the password immediately using the
passwdcommand.You can now establish an SSH connection with the Fabric Server. To learn how, go to the Establishing an SSH Connection section.
Execute the fabric-app-installer command exposed to the cmdr-admin user. You are reminded to configure the NTP server after installing the Fabric applications.
Confirming NTP Server Configuration
Click OK. The system reboots.
Execute the config-ntp command to configure and manage the NTP server in the Fabric Server instance.
Warning
It is mandatory to synchronize the time between all the Director components: Fabric-enabled Logpoint instances, Logpoint Search Master, the Fabric Server, and the API Server.
Cluster mode creates a group of servers that work together to maintain high availability of applications and services. If one Fabric Server fails, another server in the cluster can take over its workload. The number of servers required to overcome n number of server failure is 2n+1. To overcome two server failures you need to install five servers in the cluster.
Note
The Director setup currently handles up to three server failures.
If you are deploying the Fabric Server AMI in cluster mode or if you are scaling the Fabric Server instances, you must create a route table and stop source/destination check in the AWS management console. A route table ensures the network traffic is directed correctly. For details, go to the Accessing the Fabric Server Instance section.
You must install each Fabric Server instance individually in the cluster mode.
The Domain name for each Fabric Server instance should be the same.
You must repeat the installation cycle if you install a new Fabric Server instance.
To configure Fabric Server instances in the cluster mode:
Select Cluster and click OK.
Selecting Fabric Server Installation Type
Enter the number of Fabric Server instances to be installed and click OK.
Entering the Number of Cluster Node
Enter the Fabric Proxy Node ID for the Fabric Server instance and click OK. The Fabric Proxy Node ID must be different for each instance. If the Fabric Proxy Node ID of the Fabric Server instance is 1, it is configured as the Master Fabric Authenticator Server. Alternatively, it is configured as the Fabric Authenticator Slave Server.
You must complete the Master Fabric Authenticator Server’s setup before the Fabric Authenticator Slave Server’s setup.
Entering the Fabric Proxy Node ID
Specify the IP addresses of the interface and their respective tunnels. Each Fabric Server instance has a private tunnel for a secure communication. The tunnel IP is the internal IP address through which the Director components communicate with each other.
Entering the Interface IP and Tunnel IP
Click OK.
Note
The number of interfaces is determined by the number of instances.
The IP addresses of the Fabric Server instances must be entered sequentially.
Summary of the Specified Configuration
Click Continue. Click Back to revisit the configurations. The system reboots to support the new configurations.
Enter the Fabric Server’s default credentials:
username: cmdr-admin
password: changeme
We recommend you to change the password immediately using the passwd command.
You can now establish an SSH connection with the Fabric Server. To learn how, go to the Establishing an SSH Connection with the Fabric Server section.
Execute the fabric-app-installer command exposed to the cmdr-admin user.
If the current Fabric Server instance is your Master Fabric Authenticator Server (when the Fabric Proxy Node ID is 1):
8.1. Enter the Fully Qualified Domain Name (FQDN) of all Fabric Authenticator Slave Servers.
Fabric Authenticator Slave Servers
8.2. Click OK.
Confirming the Server Details
8.3. Click Continue. You can click Back to revisit the configuration.
8.4. Enter the tunnel IP address of the respective Slave Fabric Authenticator Servers.
Tunnel IP-Address for Slave Servers
8.5. Click OK.
Server Details
8.6. Click Continue. The system reboots after installing the Fabric applications.
If the current Fabric Server instance is your Fabric Authenticator Slave Server when the Fabric Proxy Node ID is other than 1:
9.1. Enter the IP address of the Master Fabric Authenticator Server.
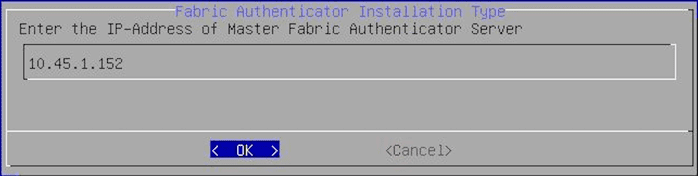
IP-Address of Master Fabric Authenticator Server
9.2. Click OK. The system reboots after installing the Fabric applications.
After successfully installing the Fabric applications on all the Fabric Server instances, execute the start-fabric-app command in the Master Fabric Authenticator Server to initialize the Fabric application.
Execute the config-ntp command to configure and manage the NTP server in all the Fabric Server instances.
Warning
It is mandatory to synchronize the time between all the Director components: Fabric-enabled Logpoint instances, Logpoint Search Master, the Fabric Server instances, and the API Server.